
Google Chat integration with Salesforce connects team communication with Salesforce data, helping teams receive important updates without constantly switching between platforms. It makes collaboration simpler and keeps sales teams informed.
The integration works across three key components:
- Salesforce: Acts as the source system for business information, record updates, and automation.
- Google Cloud Console: Provides the API configuration and authentication required for Salesforce to communicate with Google Chat.
- Google Chat: Acts as the communication platform where notifications are posted to the relevant Sales Representative.
A Salesforce Google Chat Integration can automate notifications based on Salesforce activities and records. Using the Google Chat API Salesforce setup, teams can configure authentication, API access, chat spaces, and Salesforce automation.
In this guide, we’ll walk through the complete Google Chat Integration setup, starting with Google Cloud configuration and then moving into Salesforce. Here are the steps to follow.
High-Level Integration Architecture
⬇
OAuth Authentication
⬇
Google Cloud
⬇
Google Chat API
⬇
Google Chat
⬇
Sales Representative
The detailed Salesforce process is:
⬇
Account/SOW Trigger
⬇
Trigger Handler
⬇
Queueable Apex
⬇
Salesforce Named Credential
⬇
Google Chat API
⬇
Google Chat Space
⬇
Sales Representative
Steps to Set Up Google Cloud for Salesforce Google Chat Integration
Before configuring Salesforce, you need to set up the Google Cloud project, authentication, Google Chat API, and required permissions. This Google Chat Integration setup allows Salesforce to communicate with Google Chat securely through the API and OAuth authentication.
Step 1: Open Google Cloud Console
- Open Google Cloud Console in your browser.
- Sign in using the Google account you want to use for the integration.
- You will be redirected to the Google Cloud Console dashboard.
Step 2: Create a Google Cloud Project
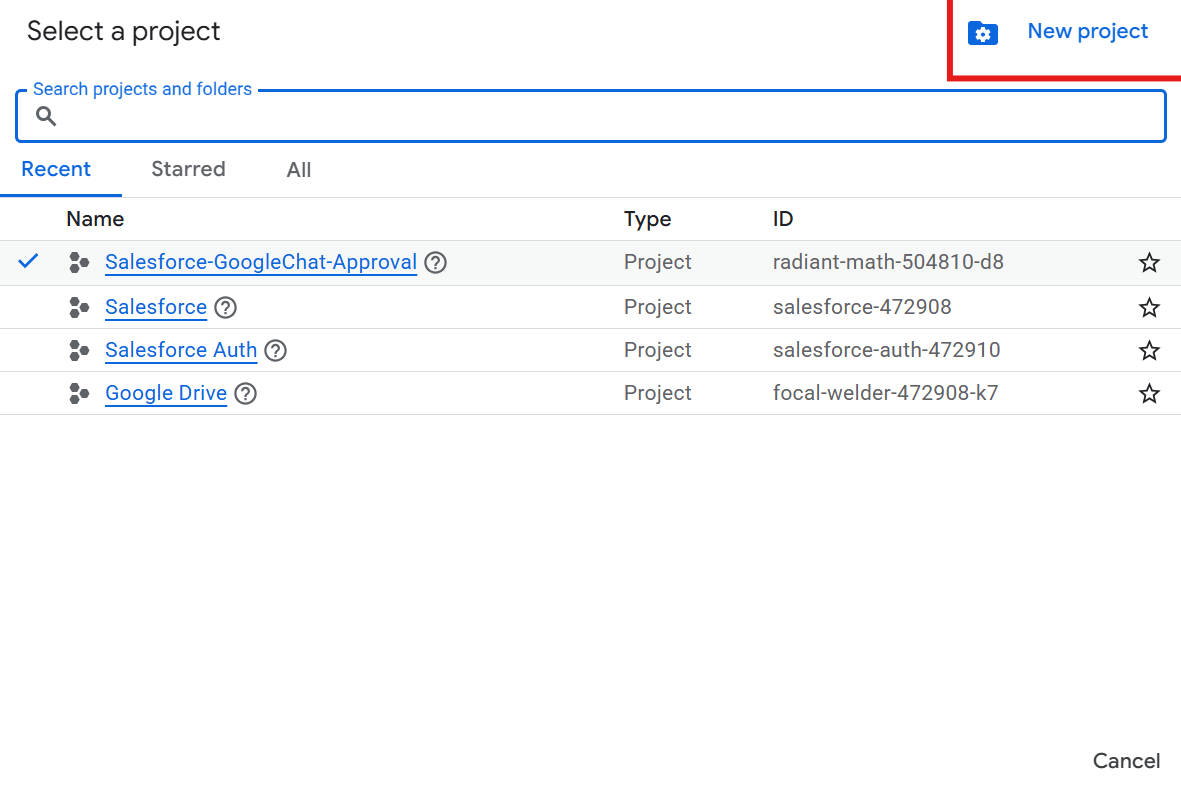
- Open the Project Selector from the top of the Google Cloud Console.
- Click New Project to create a project for the integration.
- Enter a meaningful project name, such as Salesforce-Google-Chat-Integration.
- Select the appropriate organization and location if required.
- Click Create to create the project.
- Select the newly created project from the Project Selector.
A dedicated project provides the base for configuring the APIs and authentication required for the Salesforce Google Chat Integration.
Step 3: Configure Google Auth Platform
- Open Google Auth Platform from the Google Cloud Console navigation menu.
- If you see Get Started, click it.
- Enter the required application information:
- App Name: Salesforce Google Chat Integration
- User Support Email: Select the appropriate Google account or email.
- Select the Audience based on your integration requirements.
- Choose Internal if the integration is limited to your Google Workspace organization.
- Choose External if users outside the organization need to authorize the application.
- Add the required contact information and save the configuration
Step 4: Create an OAuth Client
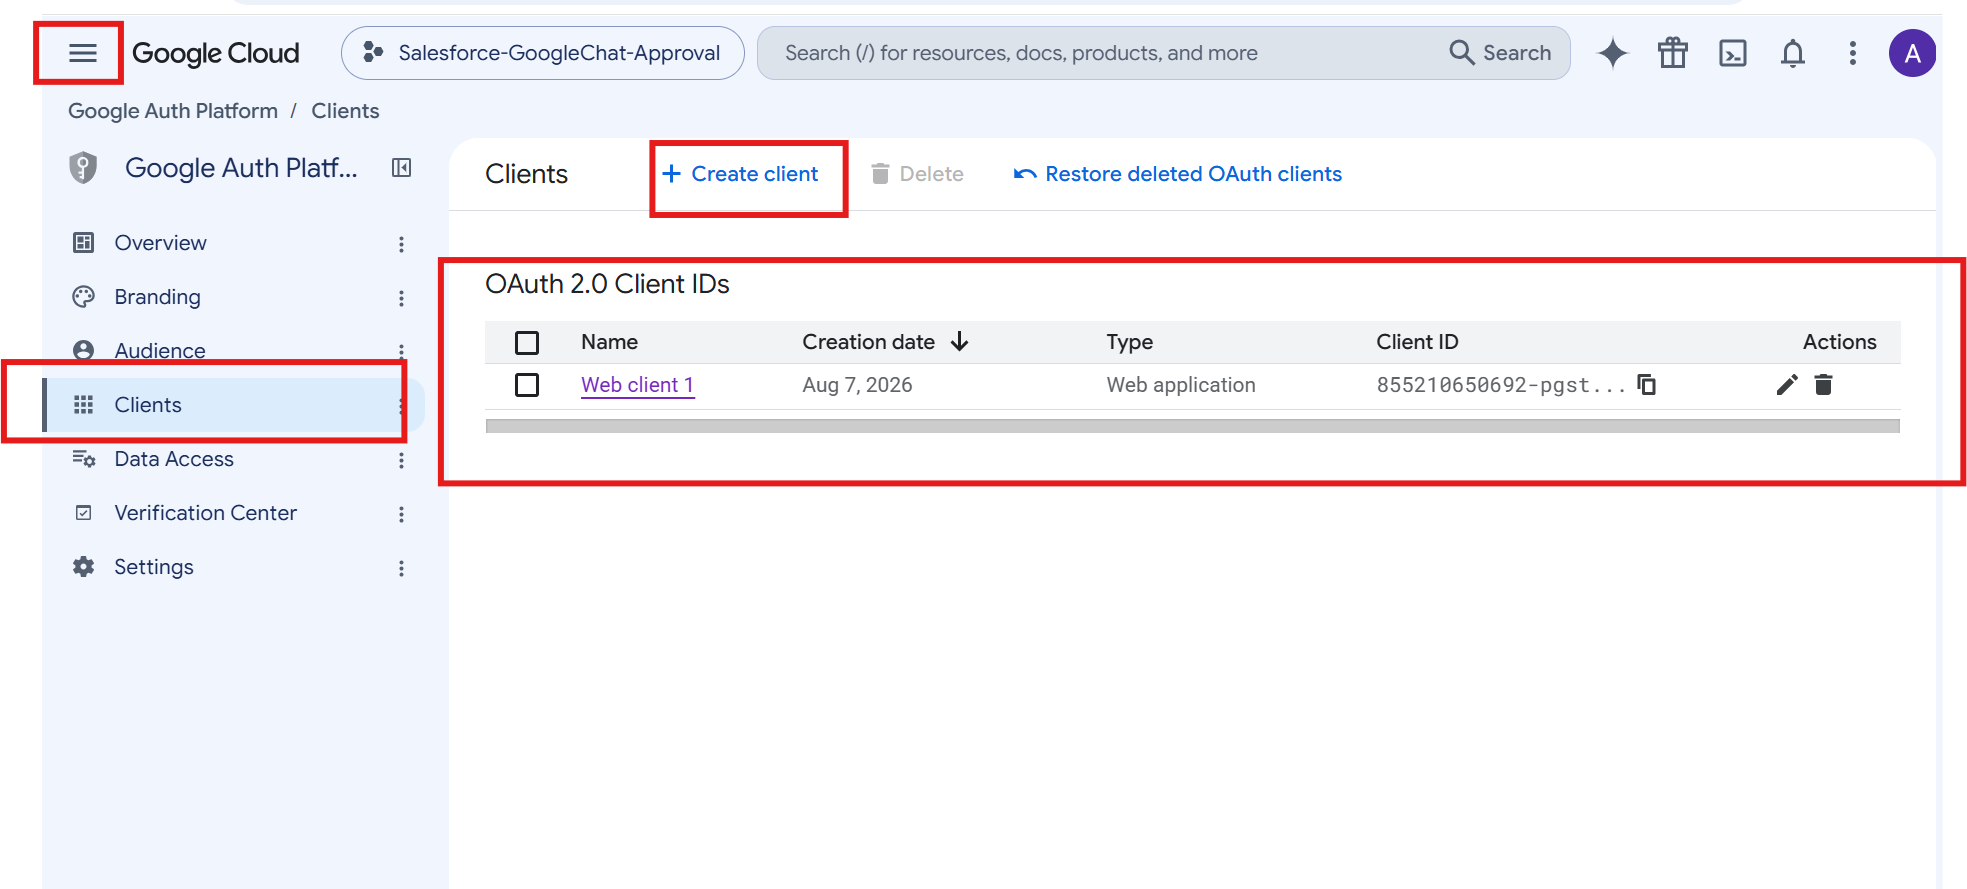
- Go to Google Auth Platform → Clients.
- Click Create Client.
- For Application Type, select Web Application.
- Enter a name such as Salesforce Google Chat OAuth.
- Under Authorized Redirect URIs, add the Salesforce OAuth callback URL.
- Make sure the redirect URI exactly matches the callback URL configured in Salesforce.
- Click Create to generate the OAuth credentials.
Google will generate the Client ID and Client Secret, which will later be used for Salesforce authentication.
Step 5: Enable Google Chat API
- Open APIs & Services → Library.
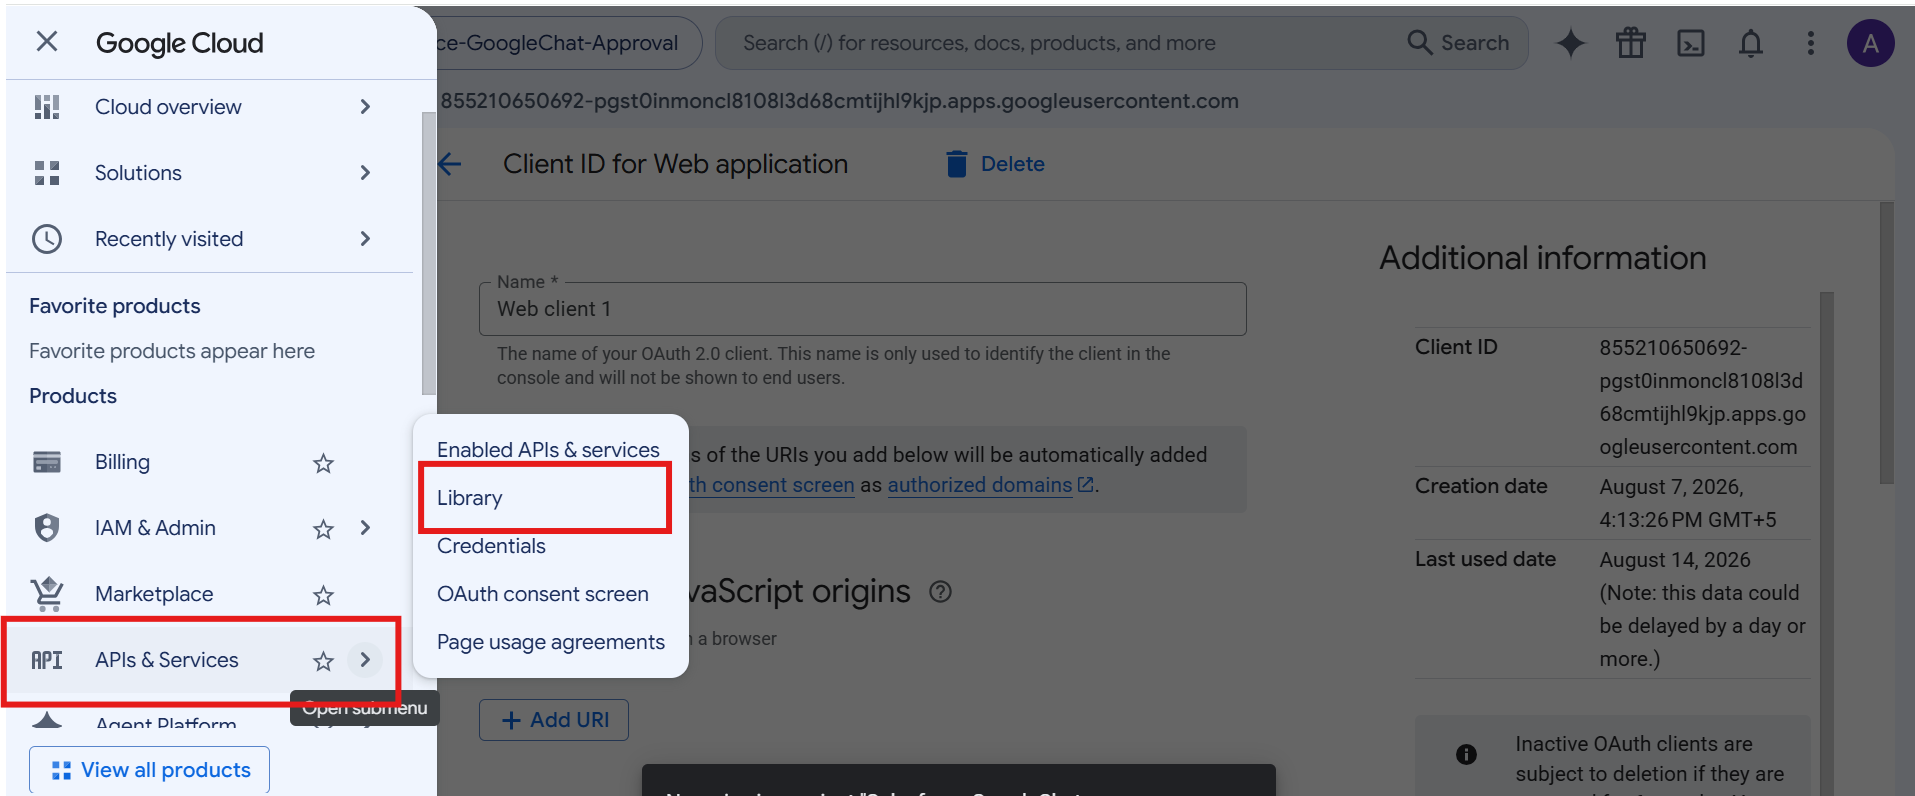
- Search for Google Chat API.
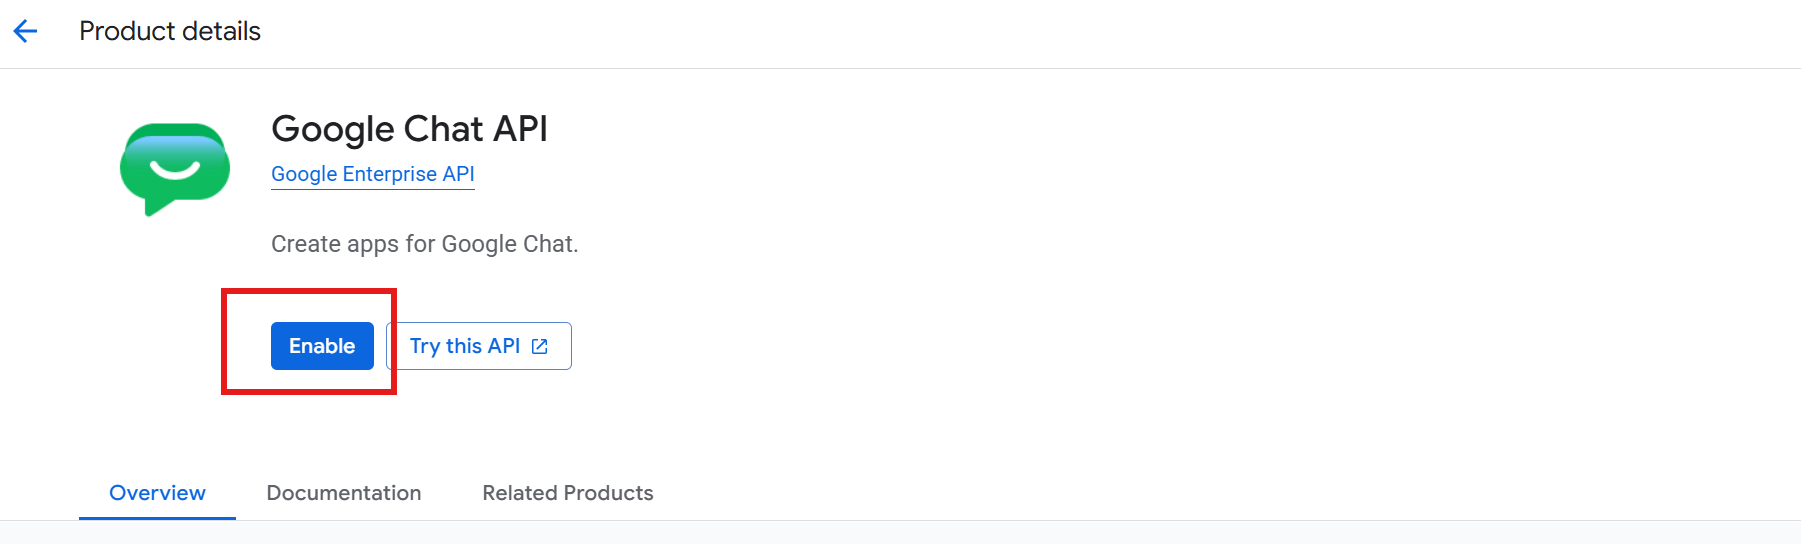
- Select Google Chat API from the search results.
- Click Enable.
- Go to APIs & Services → Enabled APIs & Services.
- Verify that Google Chat API appears in the enabled APIs list.
The API needs to be enabled so Salesforce can communicate with Google Chat through the integration.
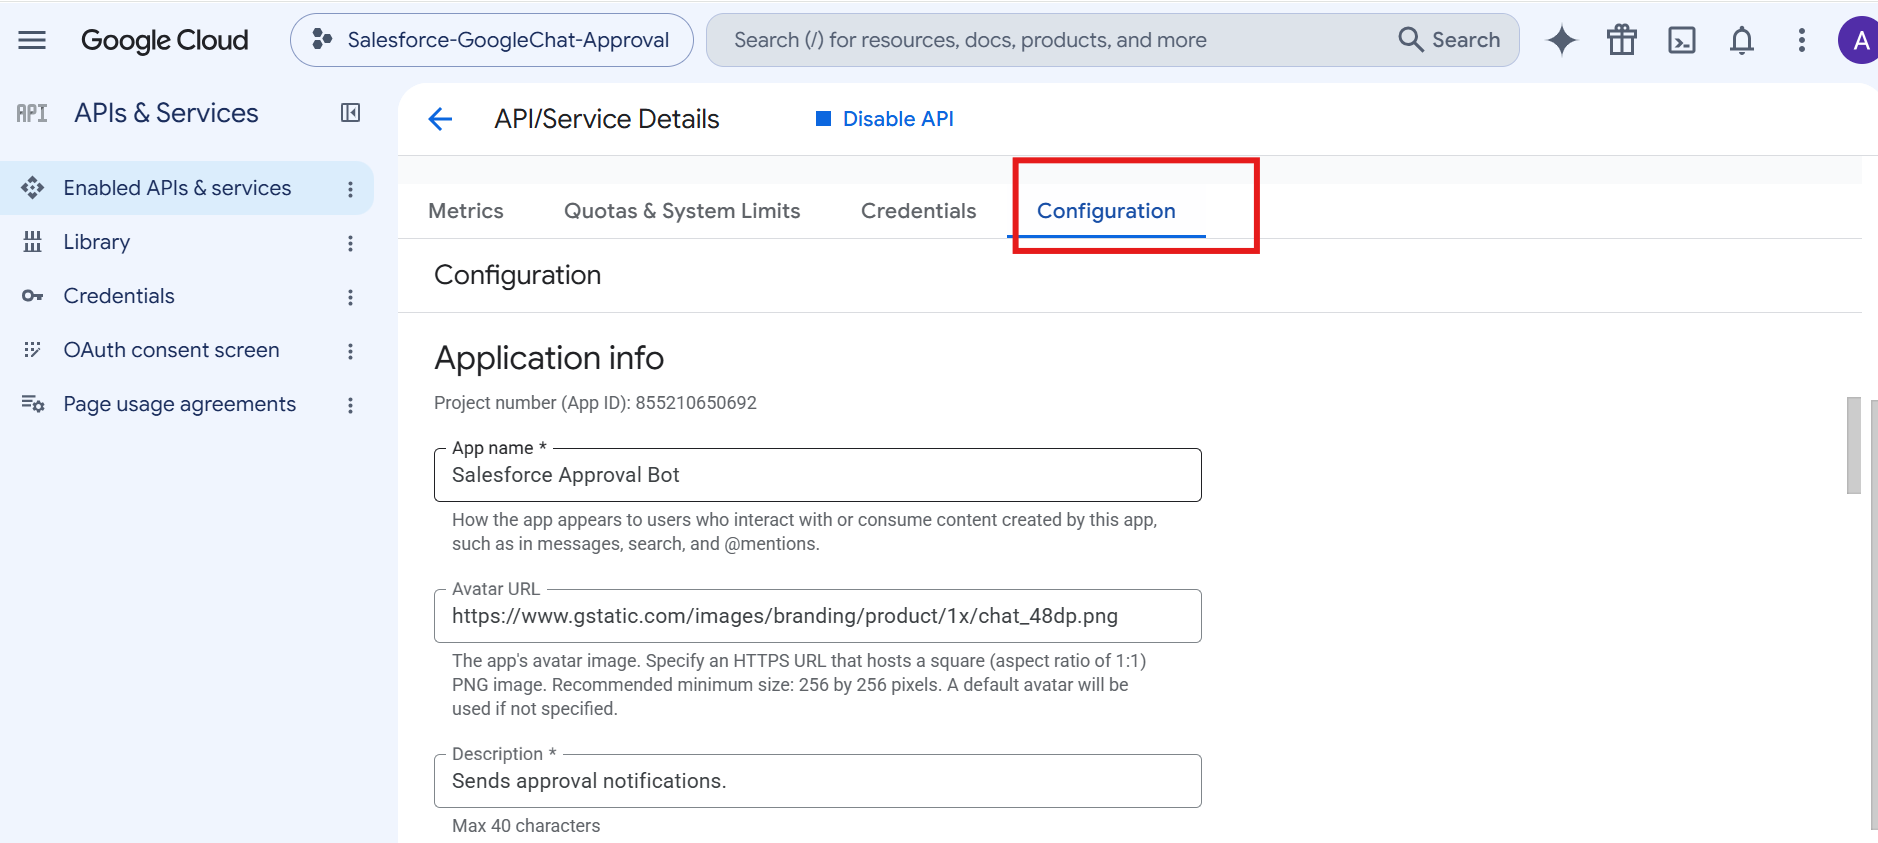
Step 6: Configure Google Chat API
- Open Google Chat API from the Google Cloud Console.
- Click Manage and open the Configuration tab.
- Configure the Chat application details:
- App Name: Salesforce Notification Bot
- Avatar URL: Add an appropriate image URL.
- Description: This Chat app sends Salesforce notifications to Sales Representatives.
- Configure the application functionality according to your messaging requirements.
- Configure Cloud Logging if required.
- Click Save.
Step 7: Configure OAuth Scopes
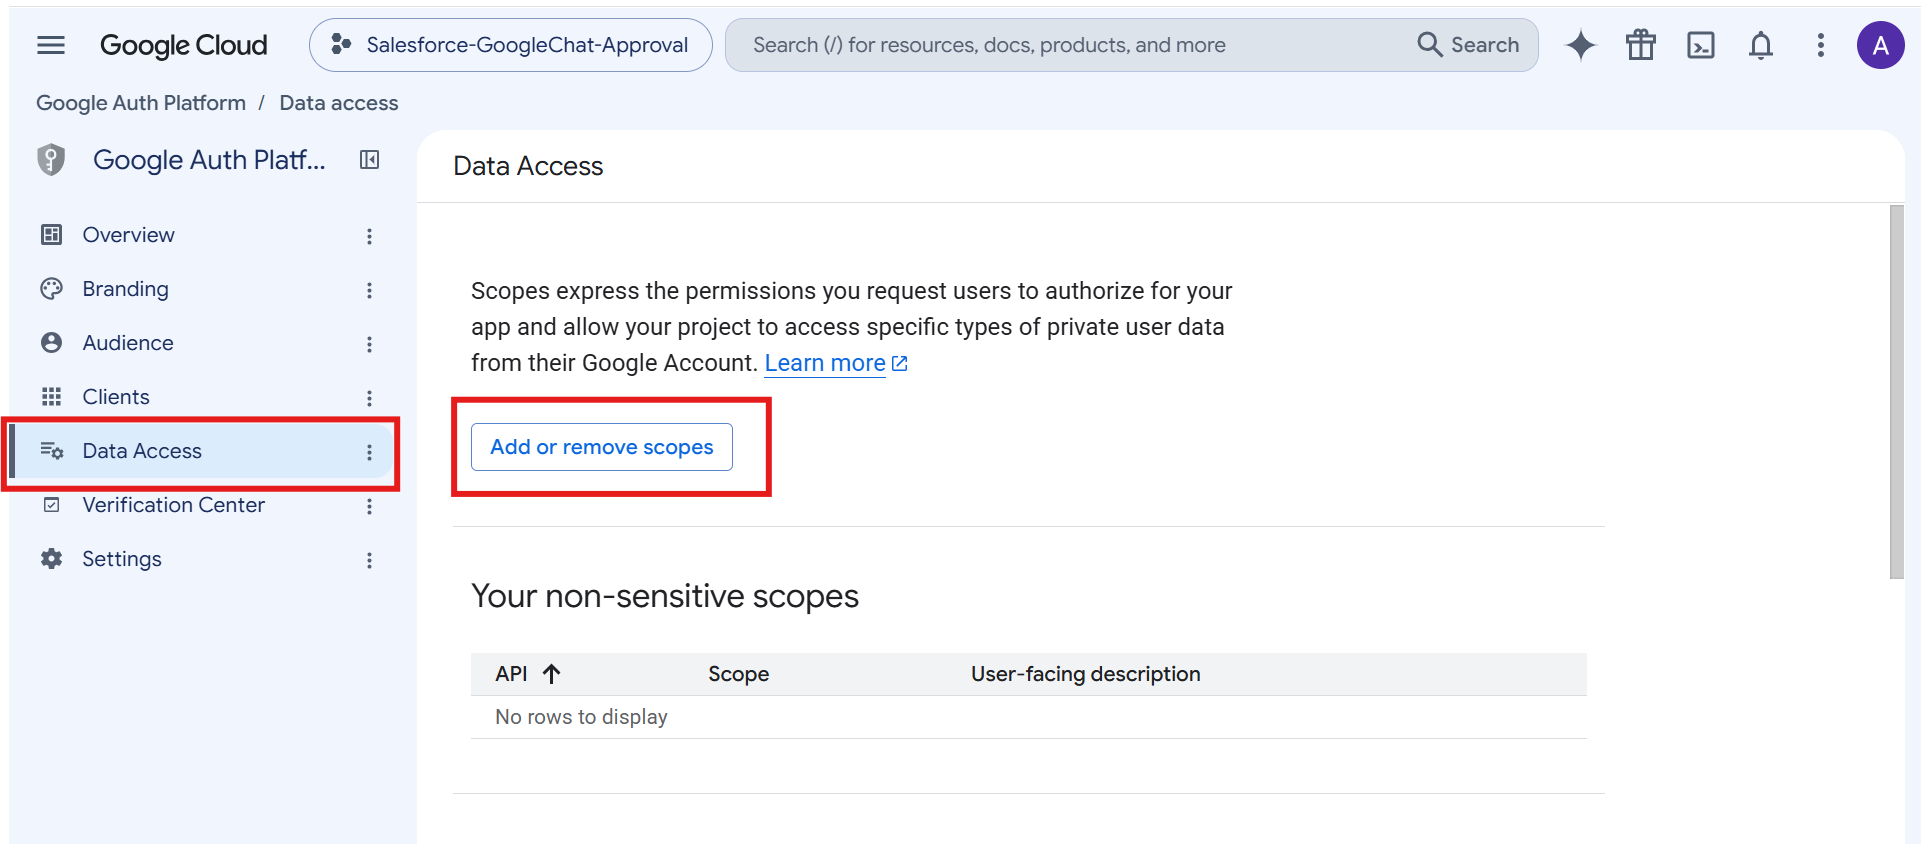
- Go to Google Auth Platform → Data Access.
- Click Add or Remove Scopes.
- Add the scopes required by your selected authentication method.
- For message creation using user authentication, you can use: https://www.googleapis.com/auth/chat.messages.create
- Make sure the configured scopes match the authentication method and Google Chat API operations used by the Salesforce integration.
Note: The required OAuth scope depends on the authentication method and Google Chat API operations being used. Make sure the scopes configured in Google Cloud match the authentication configuration used in Salesforce.
At this point, the Google Cloud and Google Chat configuration is complete.
Step 8: Configure Salesforce
After completing the Google Cloud and Google Chat configuration, the remaining setup is performed in Salesforce.
The Salesforce configuration will handle:
- OAuth authentication
- Secure credential management
- Google Chat API callouts
- Account field-change detection
- Notification generation
- Sending notifications to the appropriate Google Chat space
The Salesforce architecture will follow this flow:
⬇
Named Credential
⬇
Apex
⬇
Google Chat API
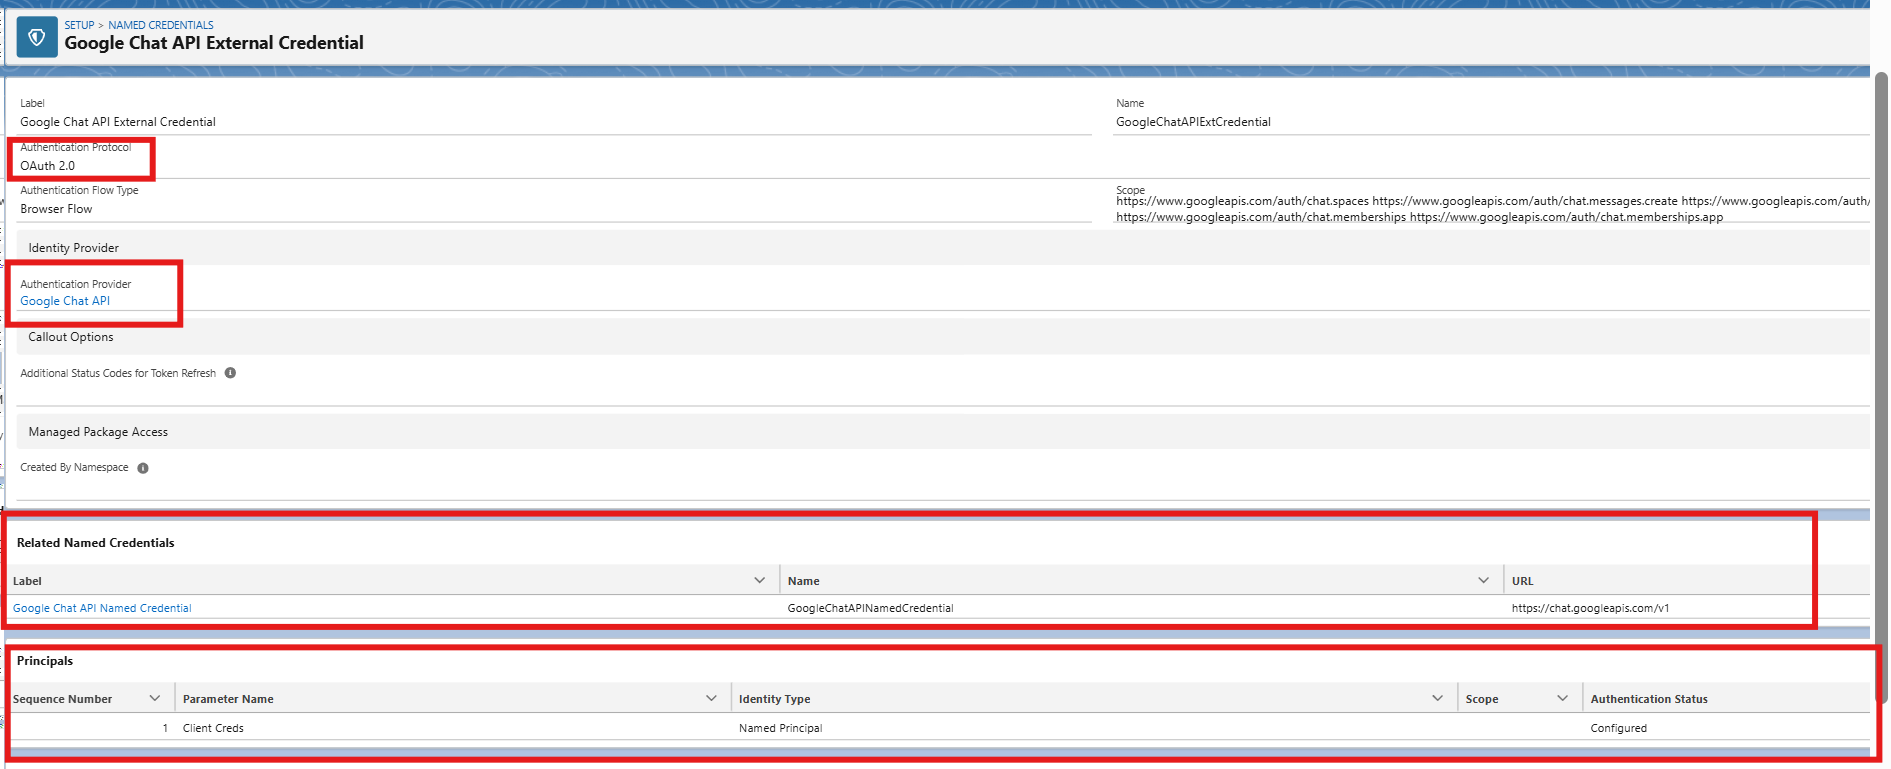
Step 9: Create External Credential
Salesforce uses External Credentials to securely manage authentication with external services.
Go to Setup → Named Credentials → External Credentials.
Click New and enter:
- Label: Google Chat External Credential
- Name: Google_Chat_External_Credential
- Authentication Protocol: OAuth 2.0
- Authentication Flow Type: Select the OAuth flow appropriate for your Google authentication configuration.
Click Save.
Step 10: Configure OAuth Provider
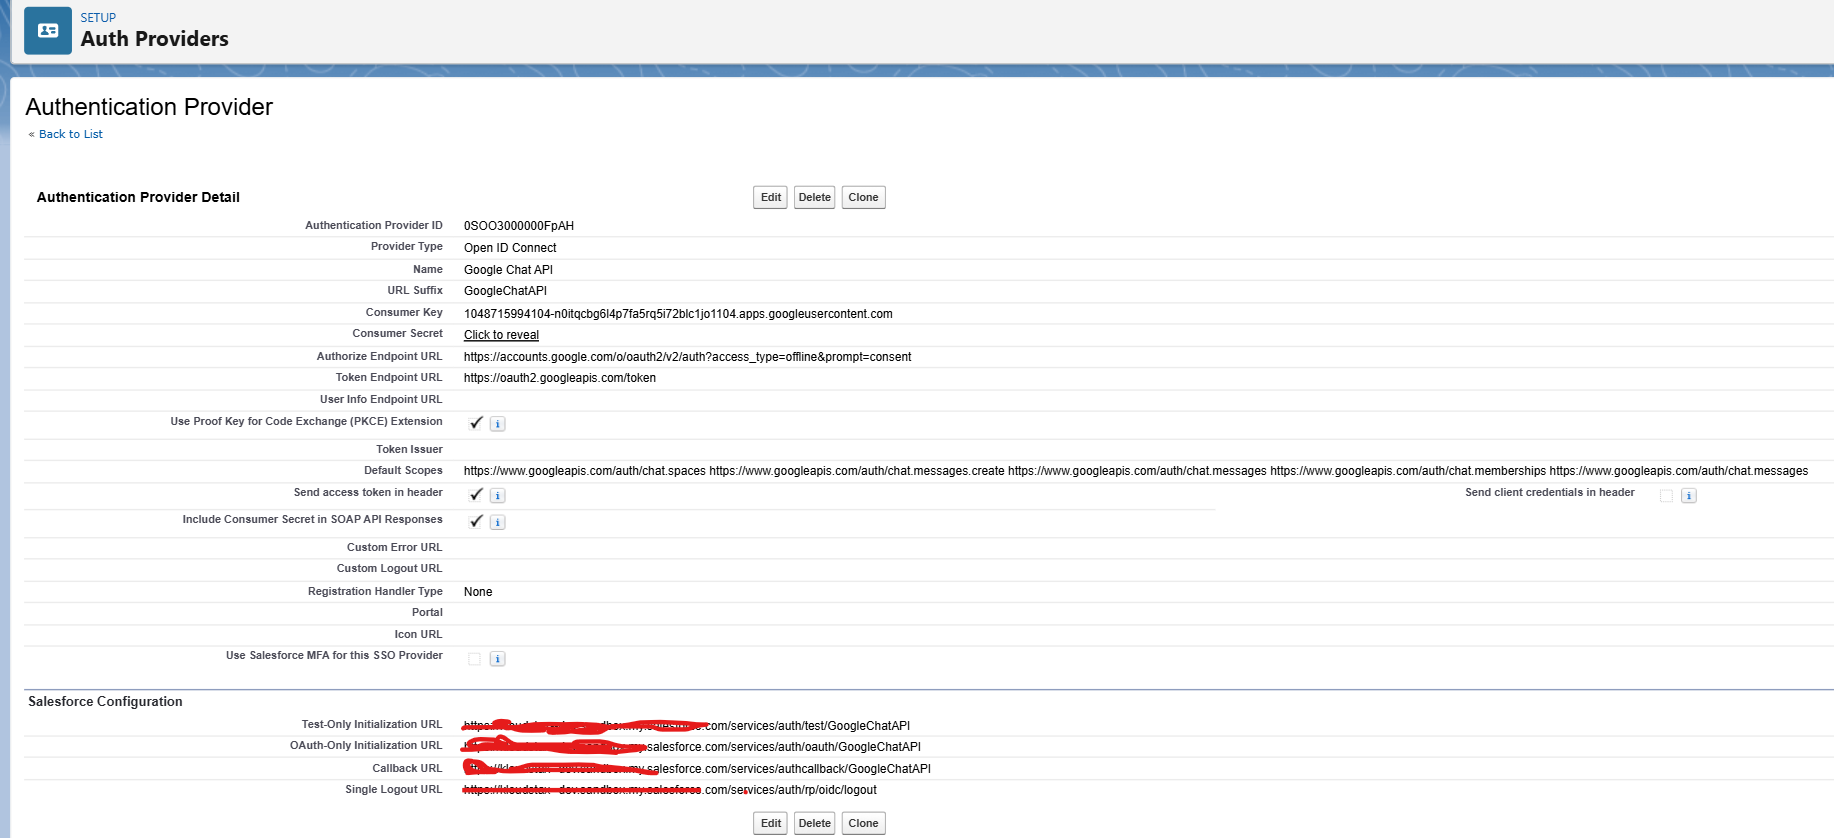
Salesforce needs the Google OAuth endpoints and OAuth client information to authenticate with Google.
Go to Setup → Auth. Providers.
Click New and select:
- Open ID Connect
Configure the provider using the OAuth information created in Google Cloud.
Enter the Google OAuth endpoints:
- Authorization Endpoint: https://accounts.google.com/o/oauth2/v2/auth
- Token Endpoint: https://oauth2.googleapis.com/token
- User Info Endpoint: https://openidconnect.googleapis.com/v1/userinfo
Enter the Client ID and Client Secret generated in Google Cloud.
Note: If the Salesforce implementation uses the newer External Credential architecture directly, a traditional Auth Provider may not be required. The authentication approach should match the OAuth flow selected in the External Credential configuration.
Step 11: Configure External Credential
Go to Setup → Named Credentials → External Credentials → Google Chat External Credential.
Configure the required authentication parameters and OAuth scopes.
For example:
https://www.googleapis.com/auth/chat.messages.create
Make sure the configured scopes match the authentication method and Google Chat API operations being used by the Salesforce integration.
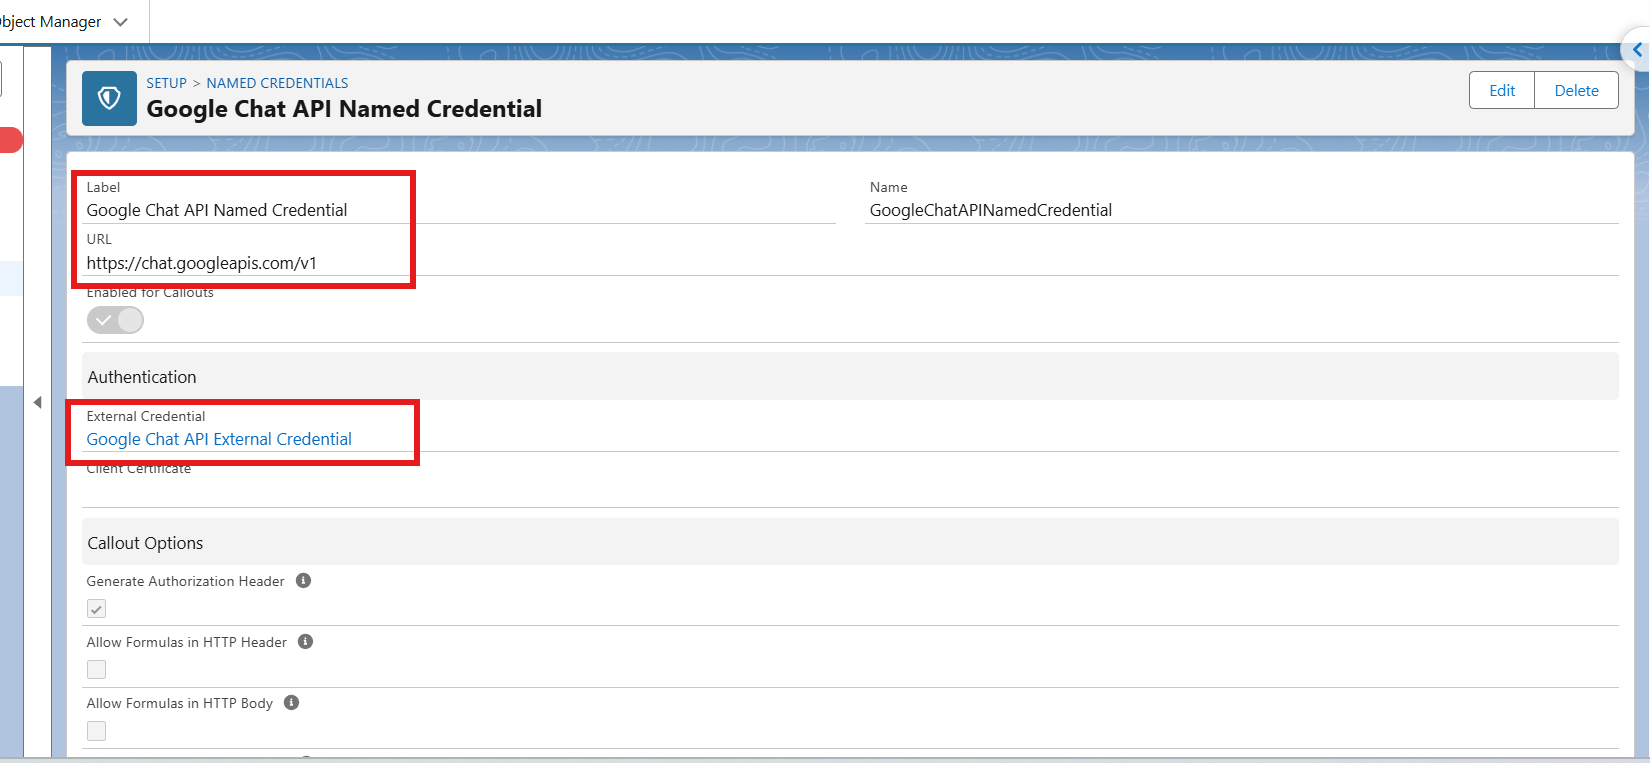
Step 12: Create Named Credential
The Named Credential provides a secure endpoint for Apex to communicate with Google Chat.
Go to Setup → Named Credentials → Named Credentials.
Click New and enter:
- Label: Google Chat
- Name: Google_Chat
- URL: https://chat.googleapis.com
Associate the Google Chat External Credential created earlier.
Save the Named Credential.
The Named Credential allows Apex to make authenticated HTTP callouts without storing the Google access token directly in Apex code.
Step 13: Create Permission Set
Create a Permission Set to provide the required Salesforce users or integration users with access to the External Credential.
Go to Setup → Permission Sets.
Create a Permission Set with a name such as:
Google Chat Integration Permission Set
Give the required users access to the appropriate External Credential Principal.
This allows the Salesforce user or integration context to authenticate against Google.
Step 14: Configure Account Field Update Notification
The next requirement is to send a Google Chat notification whenever a relevant Account field is updated.
For example, when the Rating field changes:
⬇
Field Updated
⬇
Salesforce Trigger
⬇
Trigger Handler
⬇
Queueable Apex
⬇
Google Chat API
Using Apex provides greater control over the integration, including:
- Change detection
- API callouts
- Error handling
- Message formatting
- Bulk processing
- Future enhancements
Step 15: Create Account Trigger
Create an after update trigger on the Account object.
The trigger delegates the processing to a separate handler class rather than containing the business logic directly.
Step 16: Create Account Trigger Handler
The Trigger Handler checks whether the relevant Account field has changed.
For this example, the Rating field is being monitored..
The handler compares the new Account value with the previous value.
If the Rating field has changed, the handler creates a Queueable Apex job.
Step 17: Create Queueable Apex
The Queueable Apex class performs the external HTTP callout to the Google Chat API.
Using Queueable Apex separates the Google API callout from the Account database transaction.
Step 18: Configure Google Chat API Callout
The Queueable Apex class uses the Salesforce Named Credential:
callout:Google_Chat
The API endpoint follows the Google Chat API format:
/v1/spaces/{SPACE_ID}/messages
Therefore, the complete endpoint used by Salesforce is conceptually:
callout:Google_Chat/v1/spaces/{SPACE_ID}/messages
The SPACE_ID should represent the Google Chat space where the notification needs to be posted.
Important: The Google Client ID, Client Secret, and access token should not be hard-coded in Apex. Authentication should be handled by Salesforce External Credentials and Named Credentials.
Step 19: Test Example Notification
When the Account Rating changes, Salesforce can send a message such as:
Account Update Notification
Account: ABC Corporation
Field: Rating
Previous Value: Prospect
New Value: Customer
The message will be posted to the relevant Google Chat space for the Sales Representative.
Conclusion
Setting up Google Chat Integration with Salesforce requires the right Google Cloud project, OAuth configuration, API access, and scopes before moving into the Salesforce configuration. Once configured, Salesforce can securely communicate with Google Chat and send relevant business notifications to the right users.
For businesses planning Salesforce API Integration or a broader Salesforce Google Chat Integration, working with HIC Global Solutions, an experienced Salesforce partner, can help ensure the authentication, API, and Salesforce-side configuration are set up correctly.
With the right configuration in place, teams can connect Salesforce records and updates with Google Chat while reducing manual communication and keeping Sales Representatives informed in real time.
Frequently Asked Questions
Salesforce can detect record changes, process them through Apex, authenticate using Named Credentials, and call the Google Chat API to deliver notifications to the appropriate chat space.
External Credentials, Named Credentials, Apex triggers, trigger handlers, Queueable Apex, and Salesforce automation can work together to securely connect Salesforce with the Google Chat API.
Yes. An after-update Account trigger can detect relevant field changes, such as Rating updates, and initiate Queueable Apex that sends the notification through the Google Chat API.
An experienced Salesforce partner can help configure authentication, API access, Salesforce automation, permissions, and callouts. HIC Global Solutions can support businesses implementing Salesforce API Integration and connected workflows.
Businesses can configure Google Cloud authentication and API access first, then establish Salesforce credentials, permissions, Apex automation, and API callouts. A Salesforce partner can help manage the implementation.

 India
India  USA
USA UK
UK Canada