


Salesforce Omni-Channel is a feature available across different Salesforce Clouds, including Sales Cloud, Service Cloud, and others. While it is commonly associated with customer service and support, Omni-Channel can also be utilized in the context of sales to enhance the overall sales process and customer engagement.
Salesforce’s Omni-Channel feature allows organizations to manage and route customer interactions across various channels such as phone calls, emails, web chats, social media, and more. It ensures that customer inquiries are efficiently handled by the most appropriate available agent, regardless of the channel through which the customer reaches out.
In this article, we will focus on the step-by-step process of configuring and implementing Omni-Channel in a Salesforce organization. Let’s begin!
Steps to Set up the Salesforce Omni-Channel in your org
Step 1: At first User has to enable the Omni-Channel features by following:
Quick find box → Omni-Channel Settings → Enable Omni-Channel(Checkbox)

Step 2: Create Service Channel
Quick find box → Service Channels → New


Step 3: Create Routing Configuration
Quick find box → Routing Configurations → New

Step 4: Enter the Routing Name, Routing Priority, Routing Model, and Units of Capacity then click on the save button

Step 5: We have to create a Queue to attach the Routing Configuration with Queue


Step 6: Create Presence Configurations
Quick find box → Presence Configurations → New


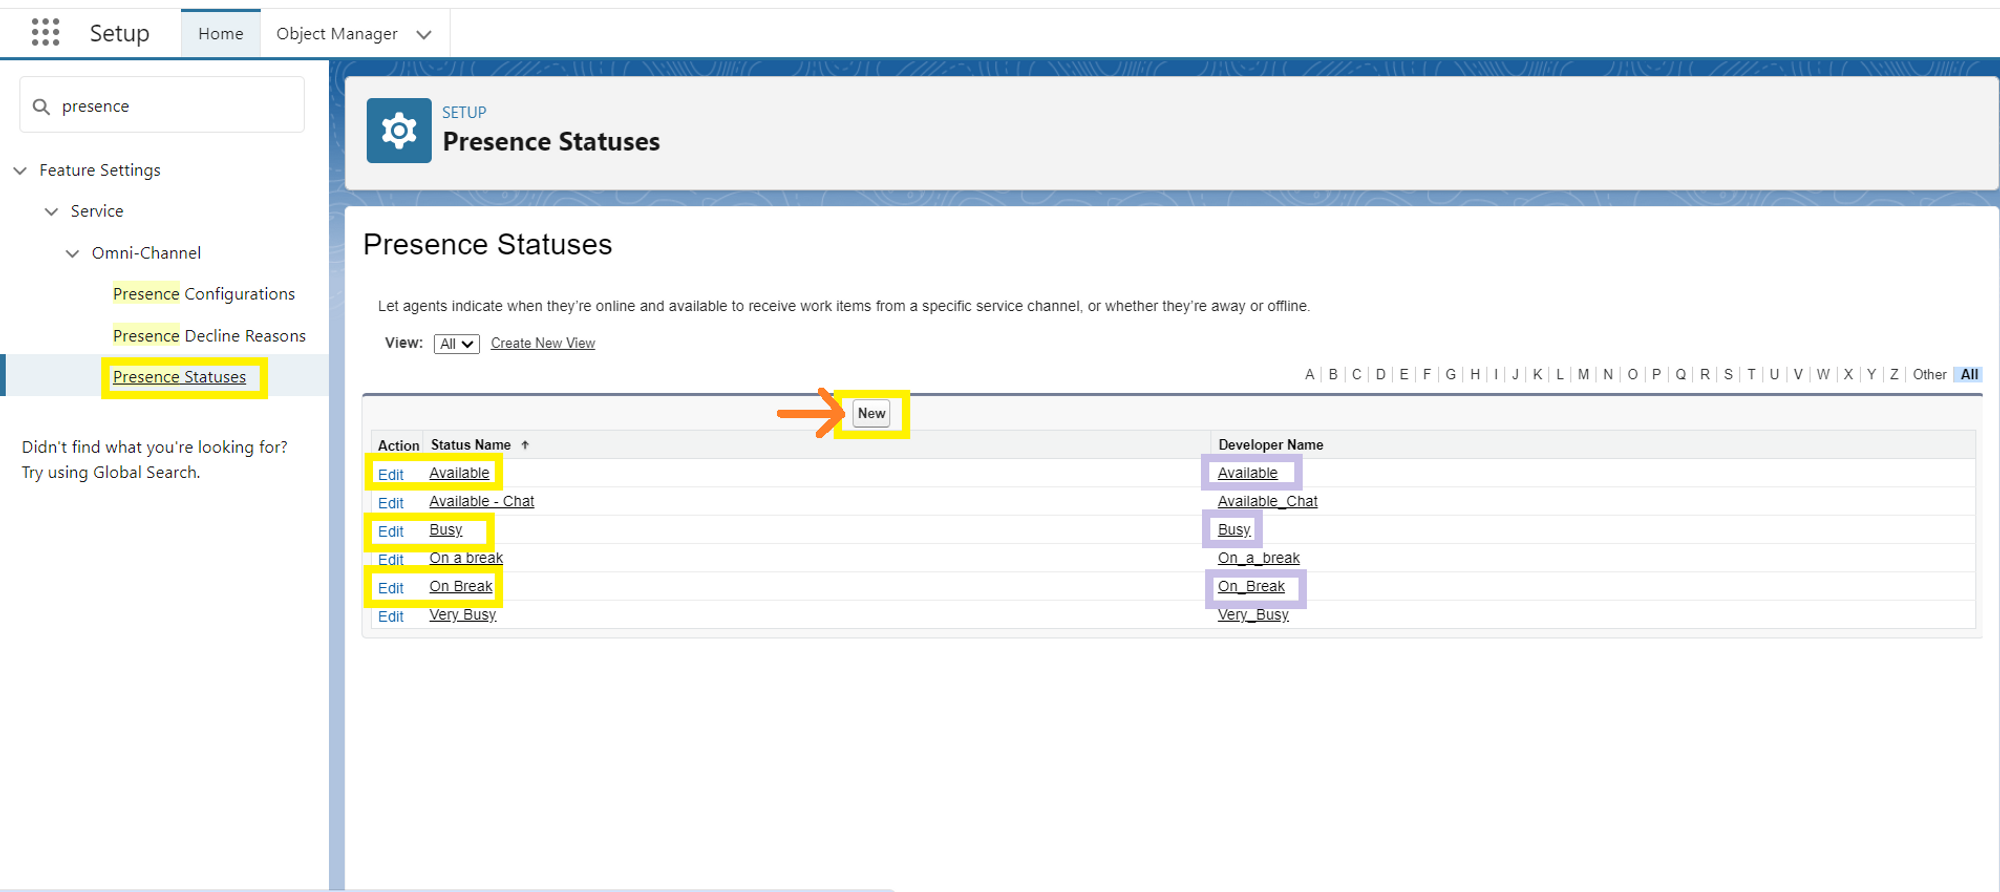
Step 7: Create Presence Statuses
Quick find box → Presence Statuses → New.
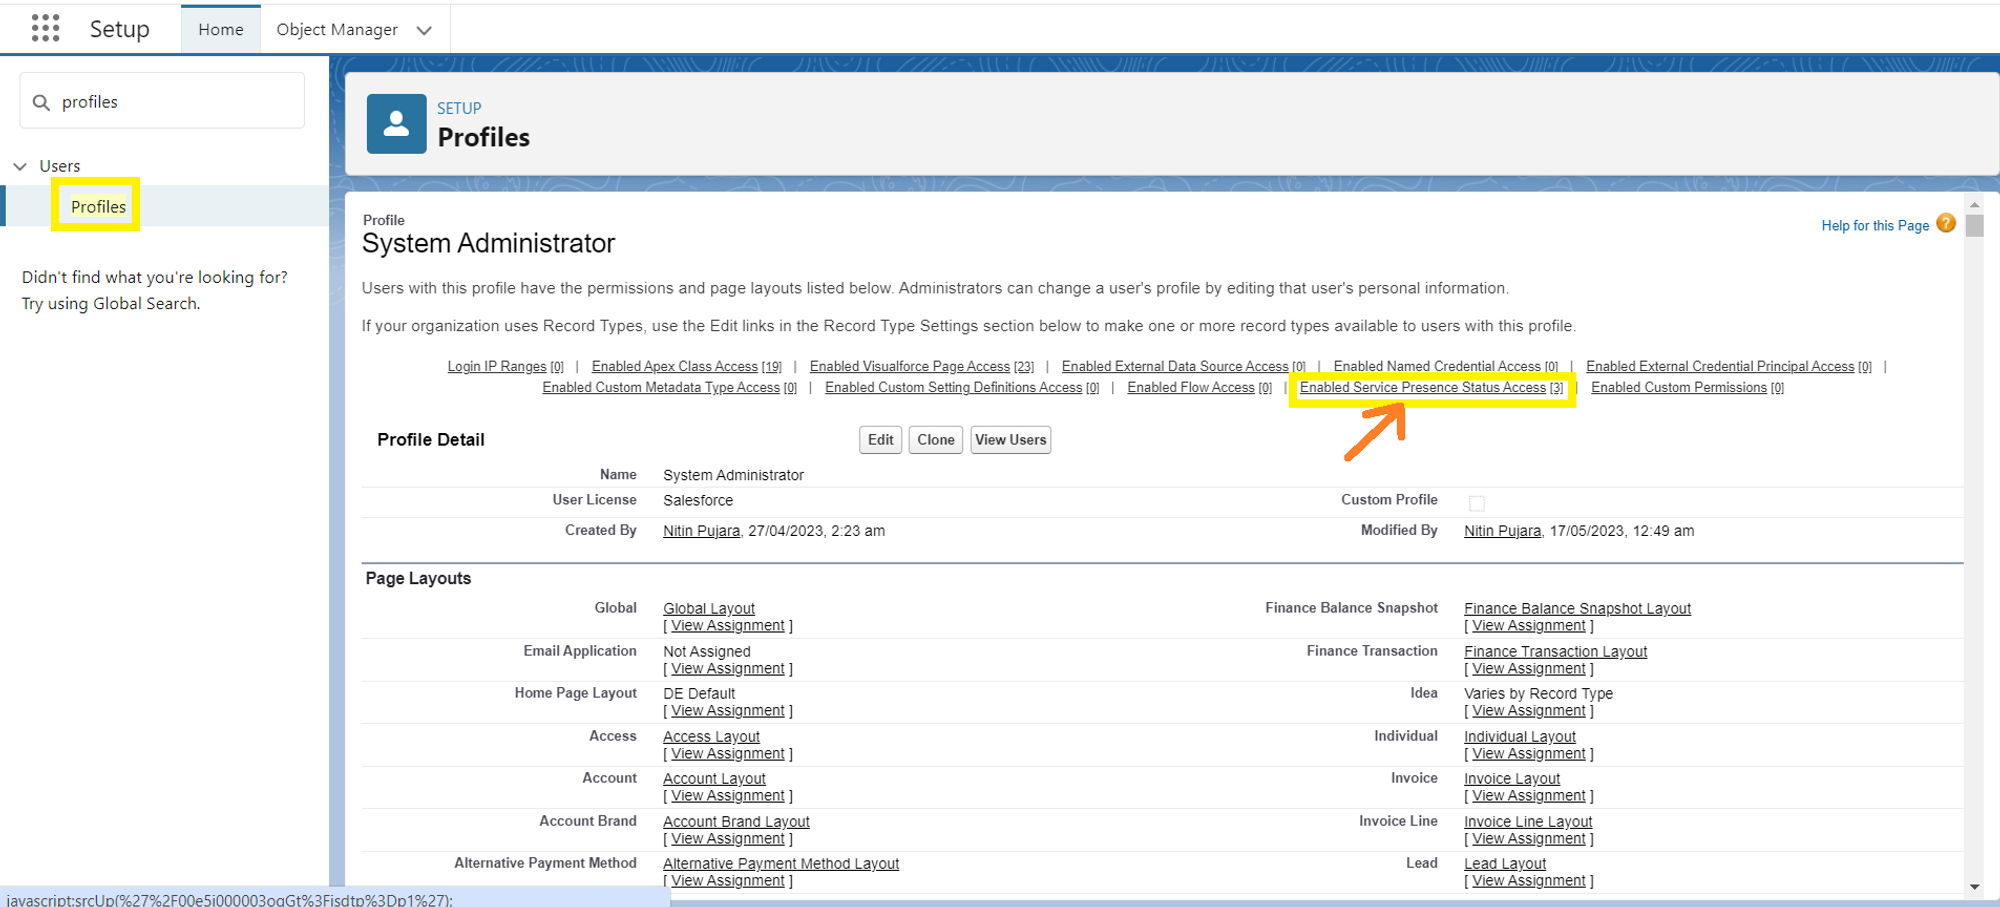
Step 8: In the System Administrator Profile grant user access permission to presence statuses
Quick Find Box → Profiles → System Administrator → Enabled Service Presence Status Access(Edit)

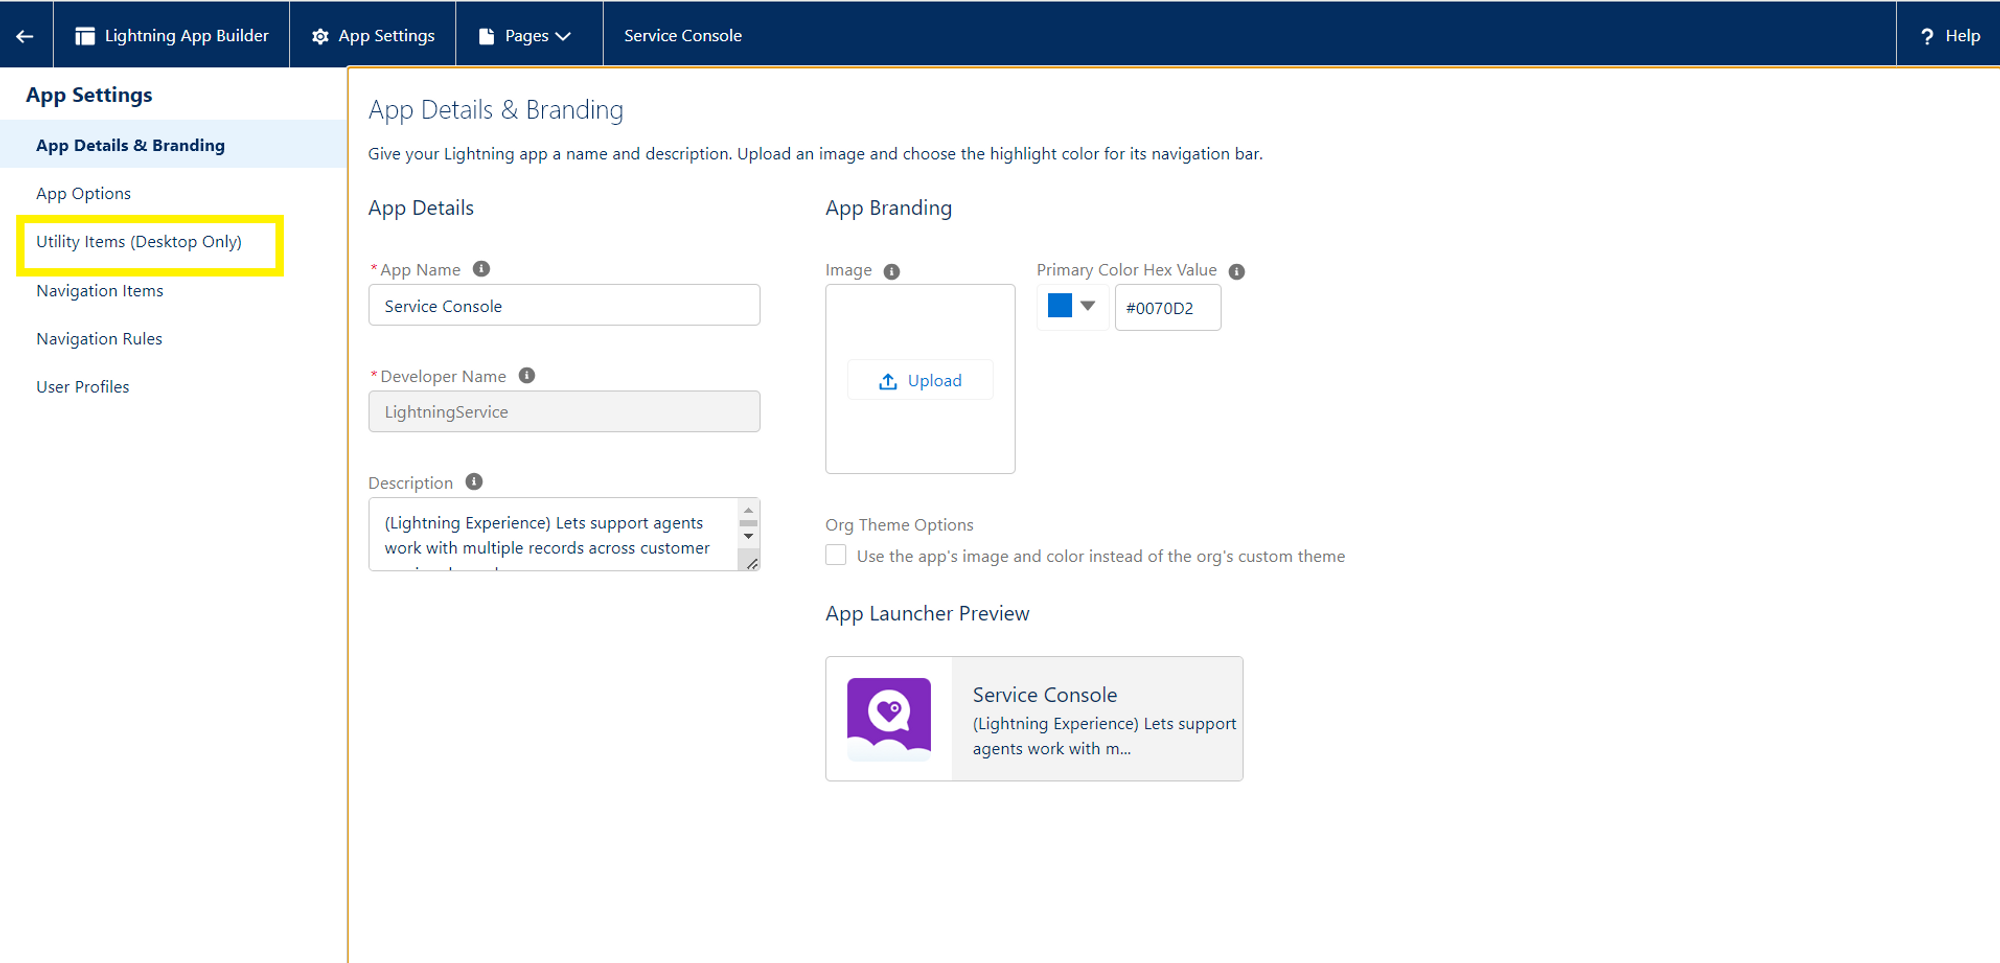
Step 9: Add the Omni-Channel Component to the Console
Quick Find Box → App Manager → App Name(Service Console) → Edit


Step 10: Navigate to Service Console, on the Console Page you will see the Omni-Channel box in the bottom left corner.
open it & select the status as you want.


When a Case is assigned to the Queue, Omni-Channel automatically routes it to an available agent.


Salesforce Omni-Channel is a feature available across different Salesforce Clouds, including Sales Cloud, Service Cloud, and others. While it is commonly associated with customer service and support, Omni-Channel can also be utilized in the context of sales to enhance the overall sales process and customer engagement.
Salesforce’s Omni-Channel feature allows organizations to manage and route customer interactions across various channels such as phone calls, emails, web chats, social media, and more. It ensures that customer inquiries are efficiently handled by the most appropriate available agent, regardless of the channel through which the customer reaches out.
In this article, we will focus on the step-by-step process of configuring and implementing Omni-Channel in a Salesforce organization. Let’s begin!
Steps to Set up the Salesforce Omni-Channel in your org
Step 1: At first User has to enable the Omni-Channel features by following:
Quick find box → Omni-Channel Settings → Enable Omni-Channel(Checkbox)
Step 2: Create Service Channel
Quick find box → Service Channels → New
Step 3: Create Routing Configuration
Quick find box → Routing Configurations → New
Step 4: Enter the Routing Name, Routing Priority, Routing Model, and Units of Capacity then click on the save button
Step 5: We have to create a Queue to attach the Routing Configuration with Queue
Step 6: Create Presence Configurations
Quick find box → Presence Configurations → New
Step 7: Create Presence Statuses
Quick find box → Presence Statuses → New.
Step 8: In the System Administrator Profile grant user access permission to presence statuses
Quick Find Box → Profiles → System Administrator → Enabled Service Presence Status Access(Edit)
Step 9: Add the Omni-Channel Component to the Console
Quick Find Box → App Manager → App Name(Service Console) → Edit
Step 10: Navigate to Service Console, on the Console Page you will see the Omni-Channel box in the bottom left corner.
open it & select the status as you want.
When a Case is assigned to the Queue, Omni-Channel automatically routes it to an available agent.
No Data Found.

 India
India  USA
USA UK
UK Canada